


What Is a Custom Lava lamp?
Lava Lamps are popular for their ability to cast a beautiful glow, but what exactly are they? What makes them different from other types of lamps? And how do you make your own Lava Lamp at home? The answer lies in the chemistry of a Lava Lamp. The lamp consists of water and oil in two separate chambers, which are connected by an electrical circuit powered by a low-voltage light bulb. When the bulb is turned on, heat causes the oil to rise through the water chamber. If you’re looking for a fun science project, or just want to add some cool lighting to your room, this guide will tell you everything you need to know about how to make your own Lava Lamp.
What is Lava Lamp Actually?
Original Lava Lamps are a novelty item that produces an illusion of flowing liquid in an irregular, slow motion. It was invented by British inventor Edward Craven-Walker and marketed as the Astro Lamp in 1963.
The Lava Lamp is a device consisting of two glass tubes with some kind of liquid poured into them; these glasses contain different colored fluids that slowly mix together to create swirling colors when light shines through them.
Custom Lava Lamp, DIY Lava Lamp
The Lava Lamp is a great gift. It’s also a great addition to any room, and you can make one yourself!
Lava lamps are easy to make. All you need is some plastic bottles, a hot glue gun, and string. You’ll also need a basic understanding of how electricity works so that when your friend turns on the switch in the room where they’ve hidden their Lava Lamp from guests’ view (you know who they are); it will emit light instead of flames or smoke like most other heaters do when turned on unexpectedly by accident…
This is a great way to make an impression on your friends, family, and neighbors. It’s also a fun project for kids to do with their parents or grandparents. Lava Lamps are easy to make, but they do require patience as the liquid takes time to settle into its final form.
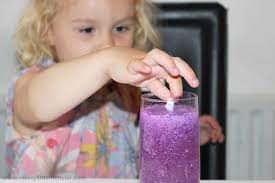
You can make your own DIY Lava Lamp at home with simple steps and materials you all need is Glass jar or Clear Plastic bottle, color dye, water, vegetable, or baby oil, and Paraffin wax. If you gathered all the material then read further below:
Setting up Lava Lamp
Step 1: Fill the base with water. You can use a container or an old coffee jar, but make sure it’s at least half full! If you’re using a coffee jar, fill it about halfway up with water and then plug in your lamp for about 15 minutes before proceeding to Step 2.
Step 2: Add wax and watch as it melts into beautiful patterns under your gaze. Be sure not to touch any part of the lamp while this is happening; if anything touches those precious flames they’ll go out forever, so just be careful around them until all of those pretty colors have been created by nature’s own handiwork (which happens very quickly).
Everyone Knows About the Disco-Era Symbol
Made from a bottom portion of mineral oil and water and a top portion of wax in a variety of colors. Some have glitter or other suspended elements in the water.
Lava Lamps are a type of lamp that simulates the flow of lava in a volcano. They were invented by British inventor Edward Craven-Walker in 1963.
Lava Lamps are made from two liquids, one of which is heavier than the other. The bottom portion is mineral oil and water while the top portion is wax in various colors. Some have glitter or other suspended elements in their water such as crushed shells or beads (or even plastic toys).
What Is The Liquid Inside Of A Lava Lamp?
The green liquid inside of a Green Lava Lamp is mineral oil and water. Some have glitter or other suspended elements in the water, but most are colored by using paraffin wax as the coloring agent. The wax can be made in different colors, including reds, greens, and blues. Water is added to the colored paraffin mixture until it has the desired viscosity—the right amount of consistency needed for pouring into your Lava Lamp base without any leaking out (and causing a mess).
The bulbs used to heat up these liquids are installed into compact lights that fit inside your standard light socket so you don’t need any special wiring or installation tools required when setting up an electrician’s truck full of Lava Lamps!
How Does It Work?
The Lava Lamp works on the principle of buoyancy. The wax is heated by the light bulb, which causes it to rise to the top of the water. As it cools and sinks down again, it forms patterns as it goes through its cycle over and over again until all that remains is a glassy substance at the bottom of your tank.
How Do I Make My Own Lava Lamp?
How to make a Lava Lamp, Follow the steps below:
- A container. You can use anything as long as it’s not too large or heavy so that it stays upright. The ideal size is about 1/2″ deep and 2″ wide, but this depends on how big of a candle you’re planning to use for lighting. You’ll also want something flat and round—like a cookie sheet! If you don’t have one at home (or any other surface), don’t worry: just place some newspaper on top of whatever surface you choose before pouring in the wax mixture.
- Some sort of oil-based paintbrush (I recommend using an old toothbrush). Try not to use one with bristles longer than 6 inches; otherwise, they may poke through the sides when applied later on during the shaping process needed for making the glitter lamps later on down below…
What Is The Difference Between Lava Lamps And Glitter Lamps?
The biggest difference between Lava Lamps and glitter lamps is that the former uses wax and oil, while the latter use glitter. More expensive, harder to make—and much more decorative in appearance (but also less fun to play with). In addition to being more difficult to construct than a traditional Lava Lamp, they’re also larger than their less fancy counterparts.
Anyone Can Create Their Own Cool Lava Lamp At Home
The beautiful Bedside Lamp is a classic piece of art that has been passed down from generation to generation. It’s easy to make, and you can do it in your very own home!
- First, you’ll need some household items like water, oil, and some wax and color dye for your base. Next, put a small amount of liquid into the bottom part of your Lava Lamp (usually called “the bowl”). This will be what’s known as “the liquid” in this case—just use whatever you want! It should be clear so everyone can see inside at all times; however, if you’re worried about being messy then just discard whatever color is already there before adding more stuff into it so they won’t see anything after they pour out their mixture onto the top surface where the layer will sit until next time when someone else wants to try out a new idea while watching a TV show while waiting outside till bus arrives.”
This is a very simple and easy project. You can try to make your own Lava Lamp, or DIY Lava Lamp in your house with the help of these instructions.
You may also like

Hindi Foreign Latest News Dialogue | Statecraft
In the interconnected world we live in, staying informed about foreign affairs is crucial. Hindi For

Unveiling Novatech: Legitimacy Assessment, Fund Recovery, And Scam Investigation
Investing in Novatech FX appears to be an unwise decision, especially given their claims of 365 perc
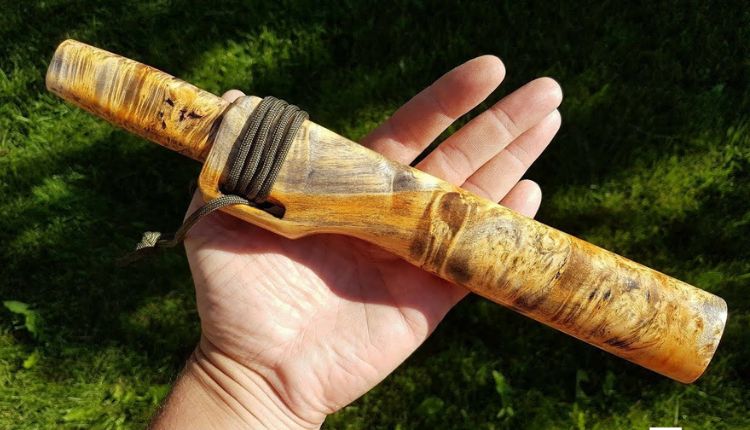
The Benefits Of Using A Yakutian Water Knife
A knife used for survival in wilderness environments. Usually it has a fixed blade. The handle is ty