
HedgeCam 2 – Advance Android Camera
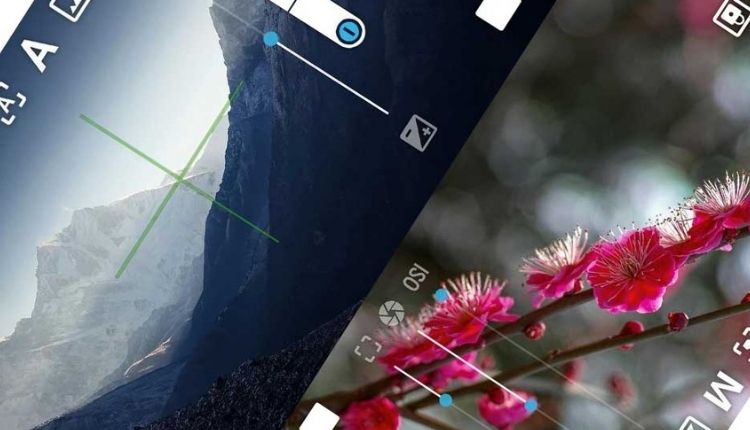
Although the app market is flooded with camera apps these days, only a few cater to the demands of aspiring or professional photographers. One of these rare jewels is HedgeCam 2. To begin with, it has a really appealing and very straightforward design.
You will begin in stills mode, but using the bottom right icon, you may quickly switch to video mode. The app displays the current time and how much memory you have left in GB at the top of the screen.
You’ll also notice an angle meter on the upper right, which may come in handy and eliminates the need for a spirit level on the tripod or grip.
Many uses external camera device on their Android TV or smart TV. But you won’t be able to download or install advance camera application like this on your TV. Because HedgeCam is not available on Play Store and Amazon App Store.
However, you can install this application on any Android TV and Fire TV using AppLinked or FileSynced. AppLinked and FileSynced are customizable Android TV app stores. You can either use TV store created by anyone else or you can create your own.
Create a free account on FileSynced to create your own TV app store. Then download Android apk files using your computer or phone and upload to your store. Easily access and install those Android apps on your TV box with FileSynced.
Advance features of HedgeCam 2
Make sure Camera2 API is enabled if you want manual focus and white balance adjustments. This is found on the first page of the settings menu, under the miscellaneous section. Manual focus is now possible with the Camera2 API enabled.
The settings menu icon can be used to choose it. Simply tap the icon with your finger on a circle. Between the +/- slider and the record button, a slider appears. The slider also indicates the focus distance, which ranges from 10cm to infinity.
You can lock auto adjustments with the padlock icon on the left, however this appears to have no effect on focus. Auto, Infinity, Locked, and Continuous are the four focus icon settings. In the settings menu, you can also manually adjust and lock ISO.
You have a very wide range of shutter speeds to choose from. Set the app to Manual Mode to see the shutter speed. The settings icon on the left can be used to change the resolution. Toggle through the available options until your device’s capabilities are reached.
When we go into the white balance menu, we have the option of using auto or one of several presets. We may use auto to establish the white balance and then lock auto adjustments to correct everything.
The manual white balance option becomes readily accessible when the Camera2 API is enabled. When the +/- control and the manual focus slider are both chosen, another slider displays.
Finally, for a free program, it does allow you to tweak your settings manually. Furthermore, the ability to lock settings can make a significant difference in the appearance of your recordings. With a little practice and familiarization with the program, you may achieve some fantastic outcomes.
You may also like
Elevating Productivity and Creativity: Exploring the Fusion of Paper Tablets with Kloudnote
The allure of traditional mediums like pen and paper continues to captivate individuals seeking simp

The Safe Way to Meet People Online
The Internet is the most ok location to Meet People at once, regardless of age, gender, religion, li

Software Development Outsourcing Company
This is the hour of innovation. Today numerous organizations are selling software in the market; yet